In my last article I have shown you my suggested modifications of Trinity.
I will change this design originally knitted for women into a knitwear design for a man.
One of my suggested modifications is to knit a closer neckline.
As you can see in the picture below, this design is featuring a v neck.

Trinity by Lisa Richardson
Making a neck line closer is not really difficult. The only things you need are some mathematics and of course your correct tension.
So – I know no one can here it any more (except my dear friend Anne from Life LackaDaisiCal, who is regularly asking: “Have YOU done a swatch?”) – you must have knitted a swatch to know your correct tension!
Let’s have a look at the neckline:
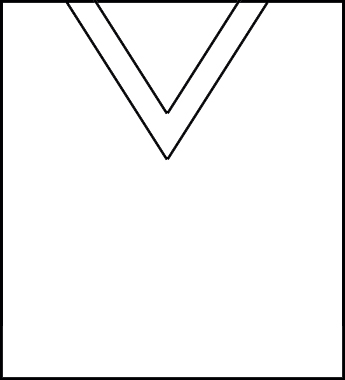
Schematic 1
In schematic 1 you see, you can not only knit some more rows, before starting the v-neck shaping. You will end up with to much stitches for the shoulders when you reach the cast off row, unless you haven’t changed the width of the neck.
Let’s start out from you don’t want to change the width of the neck, then you need to modify the decreases of your neckline.
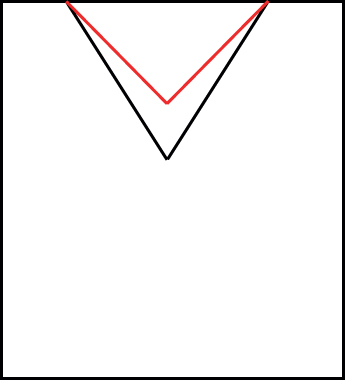
Schematic 2
In schematic 2 you see the modified neckline. You notice to get the same width of the neckline, you have to decrease faster.
A classic v neck begins shaping close to armhole depth. So the second thing you need to know (first thing is your tension, “After you have knitted a swatch“, Anne says) is your armhole depth!
Now you are able to calculate how many rows you are knitting from starting the armhole shaping to starting the shoulder shaping.
For example: If your armhole depth is 20 cm and your tension is 21 sts and 34 rows in 10 cm, you have to knit (20 x 3,4) = 68 rows from starting the armhole shaping to starting the shoulder shaping.
After you know the amount of rows you have for shaping the neckline you need to know how much rows you need for the neckline itself.
For example: If you want to have a depth of your neckline with 14 cm, you have (14 x 3,4) = 47, 6 = 48 rows for your neckline shaping.
ATTENTION PLEASE: You have 48 rows for neckline shaping, if you don’t do a shoulder shaping! If you are adding a shoulder shaping, which I recommend, you need to subtract the rows of your shoulder shaping from this calculated rows.
For example: Your shoulder shaping is knitted in 6 rows. 48 rows – 6 rows = 42 rows.
Now you know exactly how much rows you have for shaping the front neckline. And you are now able to calculate how many rows after starting your armhole shaping you have to knit, before you divide for the front opening.
In our example: 68 rows – 42 rows = 26 rows. This means 26 rows AFTER starting the armhole shaping the shaping of the v neck is starting.
Well, now you need to calculate how to do the decreases. For this calculation you need to know how many stitches you have to decrease for the front opening. Usually as much as for the back.
For example: You have to decrease a total of 36 stitches for the neck opening. Now you have to divide this amount of stitches with 2, because you will decrease the stitches on either side of the neck opening. (36 : 2) = 18 sts. Now you also know how many stitches you have to decrease.
You now know how many rows you have to knit for the neck opening (42 rows) and you know how many stitches you have to decrease knitting these rows (18 stitches). You should now calculate how often you have to do a decrease.
In our example: 42 rows : 18 stitches = 2,3 rows. This means every 2,33 row you have to decrease a stitch to form the neckline. Wait a minute, we all know, you are not able to knit 2,33 rows! So you have to decide how want to arrange the decreases.
You may do nothing and decrease every second row. This means in our example you knit (18 x 2) = 36 rows shaping the front opening and knit the last 6 rows without shaping.
Or you may decrease 15 stitches every second row and three stitches every forth row. This means in our example you knit (15 x 2) = 30 rows plus (3 x 4) = 12 rows, a total of 42 rows for shaping the front opening. Perfect, isn’t it?

Front opening
I recommend to draw a chart!
I have done one for my version of Trinity using Excel, because I also added some stripes to the design.
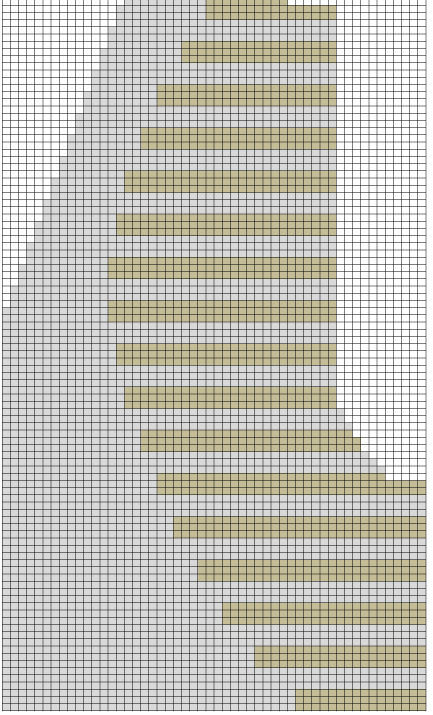
Schematic Trinity
This schematic shows the left half of the front.
Remember, if you are modifying a design you now also have to recalculate the stitches for your neckband. Because, if you knit a closer neckline the stitches given in the pattern will be to many.
An easy way to knit the neckband without calculating the stitches is: Pick up and knit one stitch for each bound-off stitch along horizontal edges and about three stitches for every four rows, along vertical or slanted edges.
Or: To determine the number of stitches to pick up (or cast on, if you plan to knit the neckband separately and sew it in place), sew the shoulder seams, then lay the garment right side up on a flat surface. Turn a tape measure on its side and measure the inner circumference of the neck opening. Multiply this measurement by the appropriate stitch tension (“Swatch?”, Anne says) to determine how many stitches to pick up.
Don’t miss to follow my dear friend Kristen on her blog to catch up how she is knitting Trinity.

You, Konrad, are my kind of knitter! 🙂 Great post!
Excellent instructions!
Very informative, thanks!